- Make It Yourself Lavender Heart-Shaped Bath Bombs!
- 20 Things You Never Knew About “Down There”
- 12 Best Foods For Those Suffering From Arthritis Pain
- 12 Personal Hygiene Mistakes Almost Everyone Makes (Mom Never Told You About #4!)
- 15 Medicinal Plants And Herbs From The Cherokee People
- 12 Mind-Blowing Benefits Of Drinking Coconut Water During Pregnancy
- 12 Outstanding Winter Foods That Won’t Fatten You Up Like A Christmas Turkey
Make Your Own Healthy Frozen Vegetable Packages

Photo credit: bigstock.com
If you are like many of us, you are trying your best to cook homemade meals using fresh ingredients. However, the facts of our everyday busy lives often mean that we need to use frozen vegetables. Or, if you are lucky enough to have a super productive vegetable garden, you might have more than you can use at one time. Wouldn’t it be great to freeze vegetables when they are at their peak of flavor? How would you like it if you could pull bags of organic frozen vegetables from your own freezer and know that they were frozen when they were at their best and that they contain no salt, no MSG, no preservatives, and no artificial anything?
You can when you do it yourself! It’s nowhere near as difficult as you might think, but it does require a bit effort and planning than washing some veggies and putting them in a Ziploc baggie. Well, don’t worry, just crank up your freezer and we will tell you step by step what you need to do to make your own healthy frozen vegetable packages.
First let’s talk about the freezer. The type of freezer you need will depend on how many vegetables you wish to freeze and how big of a family you need to provide for. If you have plenty of space in your regular freezer and don’t have a large family or a large garden, it might work out well for you. However, if you have a lot more veggies (or family) than freezer space, you might want to invest in a freezer. For most people, a 19 cubic foot or larger freezer works well. You can keep the costs low (as well as keeping your carbon footprint to a minimum) by purchasing used. If you can, purchase an upright freezer. These take up less space and are much more chef friendly when it comes to finding the foods you want. Digging through a chest type freezer for your last bag of frozen spinach when you are tired and hungry is not fun. However, chest type freezers are easier to find, so if you end up buying one of those, just be sure that you try to keep it organized with plastic stackable bins.
Now that you have your freezer space ready, you can start thinking about how you would like to store your veggies. For example, would you like to separate them individually, or would you rather make some mixes (such as peas and carrots combined or zucchini and tomatoes)? Once you have made that decision, now you can think about quantity. You can store your veggies by the cup, by recipe size (for example, if your vegetable lasagna uses two cups of tomatoes and three large sliced zucchini, you could put all those items in one bag) or in whatever type of measurement you wish. Here are some simple measurements you might want to think about:
- One medium sized bell pepper (seeded) = one cup of chopped bell pepper
- One medium sized white onion = one cup of chopped onions
- One large rib of celery (minus leaves) = a half cup of sliced celery
- Two large or three medium carrots (minus tops) = one cup of chopped carrots
Perhaps last on our list of preparations are supplies. You will need to have a sufficient amount of Ziploc type freezer bags on hand, as well as a marker to label your items. You should also have a few baking sheets, cookie sheets, and/or muffin tins for freezing purposes.
Continue to Page 2
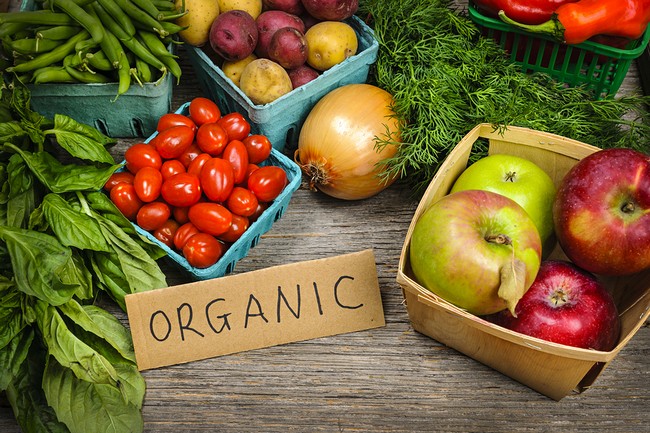
Photo credit: bigstock.com
Alright, now you are ready to start freezing your own organic vegetables.
1. Choose Your Veggies
This might be the most difficult choice! If you have vegetables from your own garden, then the choice is already made. However, if you are looking through your local farmers’ market, you might be wondering how you will ever decide which vegetables to choose from! For beginners, you can choose whatever is in season, or you can choose your favorites, or perhaps a mix of both. Once you have your chosen veggies at home, wash them, then chop or dice them as you wish. Since most recipes call for chopped veggies, which is usually the best choice. You can always dice or cut them into smaller pieces later if you need to.
2. Blanching
Although you can skip this if you are only freezing veggies for next week, if you wait any longer and you will need to blanch them. This will stop the enzymes from altering the food. If you don’t do this, your veggies will take on strange colors, textures, and flavors. Some of them will also become really tough, almost like rubber and no one wants to eat a rubber carrot. Tomatoes, garlic, and mushrooms don’t need to be blanched.
Boil one gallon of water for every 1.5 pounds of veggies. The more you can do at one time the less time it takes. Using a wire sieve, colander, or wire basket, put the veggies in the boiling water and start timing them immediately. Most veggies need about 3 minutes, but double check online for your particular vegetable. When the time is up, remove from the boiling water and dunk them in a sink of ice water to stop the cooking process. Once they are cool, take them out and put the vegetables on wire racks or paper towels and allow them to air dry for about 10 minutes.
Continue to Page 3

Photo credit: bigstock.com
3. Prepare Them for Freezing
Line your baking sheet or cookie sheet with some aluminum foil. Do not forget this important step. The vegetables will stick to the pan like the devil, but if you have lined the pan with aluminum foil, you can simply twist the foil until the vegetable pops off. If you can’t fit a cookie sheet into your freezer, then use cake pans or muffin tins. Almost anything will work.
Put your cut vegetables on the foil lined cookie sheet in a thin, even layer so that each individual piece can freeze, rather than allowing them to freeze in clumps. The larger you cut your veggie the easier this part is, but if space requires that your veggies freeze in large clumps, it’s not the end of the world.
SEE ALSO: Nutrition Packed Foods to Eat All Day, Every Day
4. Freezing
Now put the baking sheet in the freezer and allow the veggies to freeze for about 3 hours. If you are doing more than one sheet at a time, you can stack them with a piece of foil in-between each pan. Don’t leave them more than 5 hours or they can dry out.
5. Packaging
If you have more than one sheet of frozen veggies, only take out one sheet at a time. The veggies defrost fairly quickly, especially if they are cut and frozen in individual pieces. So take out just one sheet at a time. Then pop the pieces off the foil and put them in your plastic freezer bag. Squeeze as much air out of the bag as you can before closing. Label each bag and date them. Most veggies will keep for about 3 months if they stay completely frozen. When you have finished labeling them, put the bags back into the freezer right away, and then pull out the next sheet of veggies.
You can freeze a weeks’ worth of veggies at one time, or a month’s worth, even an entire garden full, the choice is yours.
Super easy, right? What are you waiting for? Go get those veggies and start making your weeknight meals much, much easier!
References: